
Tuesday, September 6, 2011
Last post for a while....
Well, school has begun! Actually, it began for me August 8th, when they let us into our new building to begin unpacking. That's the last time I actually had not a school thought in my head. Oh well, I guess I can't just make pretty things ALL the time. Plus, I've got to pay the bills somehow. Anyway, this is the most recent thing I have created, and I must say, it was not very creative; that's just paper, there's hardly anything embellishing or creative on it. It will probably be a very long time before you see anything from me again. :( This is the big fat binder that I'll be using to keep all the important information on my students. I'm figuring the bright, pretty colors will remind me of how beautiful spring and summer are.
 Well, I've got a TON of work to do, so good-bye for now.
Sunday, August 28, 2011
steno pads and book marks
This first picture is 50 bookmarks to go with the binders, for the staff. I think something needs to be on the top, but 50 of them is quite time consuming.


These two steno pads are for the principal and assistant principal.

This is one of my favorite papers from the Beyond the Garden paper pack.

It was tough to find a match for this paper, but I found some really, really old paper that was in my stash.

I like these colors. Ruby red was one of my favorites...

Two more beautiful papers. One is from the Pocket Full of Posies paper pack. I love the designs and am having a hard time parting with it (something I've GOT to get over!).


Well, that's what I've been up to for the past week (and school stuff of course....)
Hopefully I'll get at least one more post in before school starts.
Friday, August 19, 2011
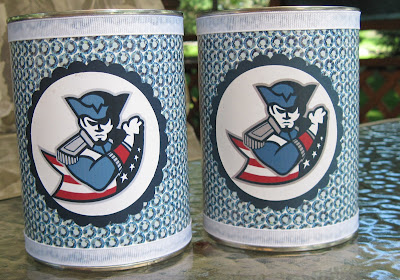
Pencil and Pen Holders
I've been busy the last couple days making these pencil and pen holders for the teachers with whom I'll be co-teaching. The desks we have at the new building don't have drawers to hold pencils and pens and such. So, I thought I'd turn some old coffee cans into pencil and pen holders. Obviously these first two are for the males.
This one I started a while ago, but never got around to finishing.


This one I started a while ago, but never got around to finishing.

This one is made from the same paper as the next one, But I sponged craft ink all over it to make it "dirtier."

This is a cigar box that I covered to match the pencil pen holder (for my desk). I hate that there are no drawers on the desks! Hopefull this box will hold the "other stuff" I usually put in the drawer of my desk.

Here's the inside view of the box. (This really was an old, nasty cigar box!)
That's all for today :)
Wednesday, August 17, 2011
My Banner
This is the banner that I made for my classroom window. It's a little more frilly than the plain one I made for the office. Sorry about the bad picture, there are no lights on in the hall, and they haven't installed my blinds yet. I've been spending so much time at school, I've barely done any fun things with paper (except the banners). I think I'm pretty close to done setting up, so I can get back to relaxation mode before it's gone....

Saturday, August 13, 2011
It has started....
Well, since they let us into the school to begin setting up the classrooms, I've already been slacking in the craftroom. Not to worry, though. I have lots on new stuff to play with and it calls me every time I come home. I have almost all my stuff moved back to school, and nearly everything put away, so I think next week I can focus on decorating. So, the banner I have been working on for my window is nearly finished, and next I'll start working on my bulletin boards. But for now, I have a wedding shower card to share. I liked the layout of the other card I made with the lace ribbon border, so I went with a variation of that, but not quite as simple. You can't see it in the picture, but the yellow layer is stamped all over with the dotted heart from the I {heart} hearts stamp set, in white craft ink. You can hardly see it in real life either because of the embossed dots on that layer. However, it looks great and I'm pleased with how it turned out

That's all for today.

That's all for today.
Monday, August 8, 2011
This is what else I've been up to for many days. I made these pages to go in the front of a binder for the staff at my school.

Yep, 50 of them.....

I also made this banner. Not sure if I'm done though. It's kind of plain, but maybe that's good for school?? I'm thinking of maybe putting the patriot mascot somewhere?


Yep, 50 of them.....

I also made this banner. Not sure if I'm done though. It's kind of plain, but maybe that's good for school?? I'm thinking of maybe putting the patriot mascot somewhere?

That's all for today. We get to get into the building today, so it's off to Parker Middle School for me.... yep, PMS!
Sunday, August 7, 2011
Still Using Leftover Parts
I'm still plugging away at my pile of unfinished projects and "parts." I had many daisies leftover from 3 years ago when I made shower gifts for my sister-in-law's baby shower. Well, last month was Lexi's 2nd birthday! I just couldn't pitch the daisies, so I made these cards:

I couldn't decide which ribbon I liked better, the retired SU! purely pomegranate or the satin mauve I had in my stash. So, I made one of each :)

Also, used up some of the retired DSP from the hostess 6x6 packs. I really am going to miss those in the hostess section.

I have another big project to post later when it's done.
Wednesday, August 3, 2011
Lace Ribbon Border Punch
I ordered this punch on my last order, and haven't used it until now. You see, I had a deal with myself; I wouldn't put in another order until I used all my new stuff at least once. It was time for me to put in an order, so I had to follow through on my deal with myself. I was not used to using this punch, so I had a hard time at first; it's meant to be used on the table and I usually use my punches upside-down in my hand. I love that it is such a simple thing and yet makes the card look so classy. This card literally took me 10 minutes to make! It would be even quicker (and still looks good) without the dotted layer.


Monday, August 1, 2011
Using up more leftovers
This first one was the original card and the rest are the remakes.

I thought I used old olive ink on this, but obviously it was wild wasabi since the old olive doesn't look so good.

I think the one above was too busy, I like this one a little more.

I think I like the cherry cobbler ink that I used in the two cards above, more than I like the ridinghood red used below.

This was a free set from SAB, I think it's the 2nd time I've used it. YIKES! It even has coordinating paper. What am I waiting for?? Oh, I know..... the NEW stuff!! LOL!!

I still have many more unfinished projects I'm trying to clear out, but that's all for today.
Sunday, July 31, 2011
Eastern Blooms
This one is a remake of the one below it.

I think I made this one two years ago for a class, and had some leftovers still sitting around.....

No more leftovers from that card :)

I think I made this one two years ago for a class, and had some leftovers still sitting around.....

No more leftovers from that card :)
Saturday, July 30, 2011
Thank you inexpensively
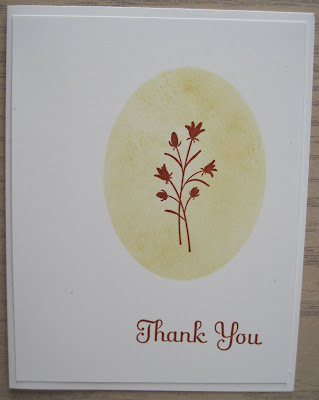
These cards are FAST and economical. On a 4 x 5 1/4 layer of whisper white cardstock, I sponged a faux layer using a punch as a template, then stamped the image directly on it. I then adhered the layer to the card and viola, a quick, cute and inexpensive thank you appears before your very eyes. They cost 26.5 cents a piece and take about two minutes to make . If you eliminate the layer on top of the card you can lower your cost to 21.25 cents each (but I think it adds a nice touch). Very economical if you have 250 thank you cards to make!! You could even do this with Christmas cards to cut the cost; that way you can send more cards!


On to another project.....
Thursday, July 28, 2011
Two things
The first item is a sign that a friend asked me to make for her wedding. It will be in a 5x7 picture frame and will be set up on a table which I believe is a "candy bar." I made the butterflies from vellum and put them on a transparency that can be adhered to the outside of the picture frame. The background DSP is from MDS and is one of the first ones they came out with on MDS called My Sweet Pea, which is, coincidentally her e-mail user name. The letters are cut with my electronic cutting device. Now that it's done, I wish I would have moved the "by you" part a little to the left. Oh well hindsight is 20-20. Her colors are aqua and red, which I had a hard time visualizing looking good together, but I think they really do look great.

This is a card that I had misplaced and just found this morning as I was cleaning out my old baskets of unfinished projects (or should I say rearranging the unfinished projects). It was actually finished, but in the unfinished basket. I really like this set called Fabulous Florets. It will be easy to make my own DSP with this (of course after I use up all my Beyond the Garden DSP). I used my re-inkers to dye the paper flowers to match.

That's all for today.
Tuesday, July 26, 2011
Bummed about my summer beauty
These things are huge!

I've waited all summer for these flowers to bloom. This year they had more buds on them than they ever had; which was obviously too much for this one!


I've waited all summer for these flowers to bloom. This year they had more buds on them than they ever had; which was obviously too much for this one!

Here's a close-up. I had been watching them and every day they looked closer to "bloom day." Finally, on Saturday it looked like one more day and I'd have flowers. Then Sunday they arrived! Sunday night however, the weight was too much and it bent over!

The only thing left to do was cut it off and put it in a vase. The vase must stay outside, though. They are quite aromatic. So much in fact, that the entire lower floor of the house smelled like them. So.... outside is where they must stay.

I can't believe how tall they are! This is the other one. It is nearly 5 feet tall!! I weaved a twig in between the lattice on the deck, to give this one support; just in case.....


Monday, July 25, 2011
My Peeps
I've been working on this cute little 6x6 album for my neice. I forgot to take a picture of the cover. It has die cut letters that say, "MY PEEPS" and an elastic closure that has one of those cutle little scallop circle flowes that looks like a carnation. I was finally able to get it done and delivered it to her yesterday. Here she is on the first page, and a peek at the other pages inside. The last page is blank because I did not have a picture of the other family members. Also, I left the scalled punch outs blank so my sister-in-law can write the names of the people on them in the language that my neice uses for them.


It's pretty plain and simple, but I'm glad it's done and delivered :)
Subscribe to:
Posts (Atom)